Remote coding with Go and the OCI SDK
Overview
For our OCI work, we have some developed some tooling using the command line client, and usually development is done on my local machine and then later deployed onto a server housed within OCI, where we leverage instance principal authentication.
There is one problem with this architecture of development. You're not doing a like for like development with creating the tools and where they actually end up running, because locally you have to use a token authentication, whereas the underlying tools end up living on a server that relies on dynamic groups for instance principal authentication.
A better practice would be if you development was done with the same dynamic group applying to where you develop your code.
Thankfully, a popular text editor/IDE, VSCode, has some tooling around remote development - so that on our local machine we can set up a SSH host to a server on OCI.
OCI Setup
Server
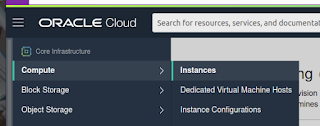
The first step is to set up the environment where we will do our development that we can set up a dynamic group against in order to support an instance principal. So in OCI head over to your computes and set up a new instance if you don't already have a candidate.
Be sure to specify an SSH key as you set up your server so that you can connect. For my case, i just went with the default of Oracle Linux. That means in order to connect we would use the opc user account.
Once you set it up you will want to validate you can connect. Something like: ssh opc@n.n.n.n.
Dynamic Policies
In order to use instance principal authentication you need to set up a policy to give your server permission to interact with the SDK. Here we use Dynamic Groups.
Head to Identity, Dynamic Groups and create a new dynamic group. I called my group OCIToolingDynamicGroup. The rule is defined that the instance ID is equal to the OCID of our compute instance, which you can find by viewing the instance details.
Now that you have the group set up, we now have to go and create a policy for that group defining what resources in OCI the compute instance has permission to access. Be careful with what you grant, because anyone with access the server may be able to interact with more parts of the tenancy that you'd like.
When defining policies, a good resource to use is this common policies document. With that in mind, the policy I end up coming up with defines the following rule:
Allow dynamic-group OCIToolingDynamicGroup to read instance-family in tenancy
After we install the OCI CLI client on the machine, we can validate it's working - see below for more details.
SDK Tooling
Once you have your server and you can connect, you will want to set up the OCI SDK. The example I will be using in this post will be using Go. But, I will also install the CLI - this is a useful tool when debugging that your policies are correct before diving into the intricacies of your language of choice (you can of course build your tooling using bash scripting).
The CLI Client
As per the documentation, since we are running Oracle Linux, we can install the client directly from the repositories. Otherwise you can manually install the client by pulling the install script from GitHub.
sudo yum install python36-oci-cli
We will want to verify we have the correct policies in place, so we can do simple list compute operation
export OCI_CLI_AUTH=instance_principal
oci compute instance list -c "TODO_COMPARTMENT_ID"
You can find your compartment ID by navigating to Administration, Tenancy Details.
Install Go
As mentioned previously, this example will be using Go. So we need to install Go and also the OCI Go SDK. The SDK requires Go minimum version of 1.13, and the default version in the repos is 1.9. Luckily, Oracle Linux provides an alternate install path which includes, as at time of writing, 1.15. As described here, run the following:
sudo yum install -y oracle-golang-release-el7.x86_64
sudo yum install golang
One of Go's tools, go get, depends on git. So, we also need to install git.
sudo yum install git
Next install the SDK. That same documentation suggests installing a package from the repo, however for whatever reason during my tests, the library didn't resolve in my program when following that method. So, you can install the SDK by running:
go get github.com/oracle/oci-go-sdk
VSCode Setup
Now that the OCI side should be all set up, we can look to set up VSCode so that we can develop from our local machine, over SSH. The tooling available in VSCode is actually quite nice.
In the market place, go ahead and search for remote - ssh. Then go ahead and install it.
Once installed, in your status bar you will see a green area with an icon that looks like a broken connection. Click on that area of the status bar and then choose the option to connect to host. Specify to add a new host and finally specify the ssh connect command. So for my compute it becomes: ssh opc@168.138.12.124. VSCode finally prompts you to save the configuration to a file. This would most likely just be your $HOME/.ssh/config file.
All these steps set up the host in your configuration so that you can easily connect. Now we have to actually connect. So repeat the steps to choose the "Connect to Host" option, and specify the host you just added.
The first time you connect, VSCode will install some things into the server which ends up to the location: $HOME/.vscode-server
The Code
Now that was have the right policies in place to allow our compute instance to interface with the SDK, VSCode is set up to be able to develop remotely, lets go ahead and actually build something to see this in action.On the project page of the Go SDK there is an examples folder which lists some common examples. The first key example is the instance principal example which shows us how to authenticate using an instance principal style configuration. The function, ExampleInstancePrincipals, goes on to list availability domains.
So, let's replicate that example. From the terminal, make a path to store your program. Replace username with your github username.
mkdir -p $HOME/go/src/github.com/username/computetool.
Open that path in VSCode, and then add a new file main.go.
At this point, VSCode will detect you are working with Go and prompt you to install it to the server. After activated, go will also prompt you to install a number of go programs that go hand-in-hand with the extension.
With all that done, we can now set up our working example:
Great, that works. Now let's move onto a program that lists the compute instances.
What we can learn from this code example is:
- We need a provider with authentication information on how we will connect
- We need a request object describing what we are doing
- We need a client object against the namespace we are interfacing with
- We call the desired operation from the client passing in our request object
In the Go SDK, computes fall under the core namespace, and the function name is ListInstances. We can come up with the following prototype.
With that we can then distribute the compiled binary to the prod location.


