Getting started with Serverless on Oracle Cloud
Serverless computing is where your cloud provider runs the servers in which your eventual application code runs, dynamically allocating resources. It allow you as the developer can focus on your application code.
Functions can be manually triggered, or fire in response to events in the tenancy, such as a compute instance changing state.
Installation
The platform the supports serverless on Oracle Cloud is The Fn Project. So to get started the first task we need to do is install this in our local machine. The pre-requisites for this software is Docker - as at time of writing, this requires a minimum docker version of 17.10. If you're on Ubuntu you can install from the package docker.io. Alternatively, you can review the installation docs for best steps to install on your platform.
Once Docker is installed, to install Fn, you can follow the install instructions as mentioned within their GitHub documentation. For a Linux environment, this is basically a matter of running an installer shell script like so.
curl -LSs https://raw.githubusercontent.com/fnproject/cli/master/install | sh
Create application
Once you have Fn installed, you should have a command on your computer available, fn. To set up the boilerplate for a serverless function we need to choose what language we would like to use. Once you've decided you use the sub-command init. This will set up a hello world style function.
$ fn init --runtime go fn-demo-hello && cd fn-demo-hello
$ ls -1
func.go
func.yaml
go.mod
So, Fn created 3 files, where the main one we will be interested in is func.go.
Run application
During development you will want to run your application locally, so do to so we need to start a local Fn server. This is provided through the sub-command start. Once started, we need to deploy our function to be able to run it. But first you need to have an application that houses the function. So we need to create an application and then deploy it through the deploy sub-command.
fn create app fn-demo-app
fn deploy --app hello-app --local
We must specify --local in order that it doesn't try to push the built image to a remote docker registry. Local basically makes it so the docker image is built and called in your local container registry. After a function deployment, we will see the function image in our local registry.
$ docker images fn-demo-hello --format "{{.Repository}} (version={{.Tag}})"
fn-demo-hello (version=0.0.4)
fn-demo-hello (version=0.0.2)
fn-demo-hello (version=0.0.3)
Now finally we will be able to test our function. In the simplest form, we can use the invoke sub-command.
fn invoke fn-demo-app fn-demo-hello
The sample function that gets created accepts a parameter in a JSON object, name. So we can change the invocation to pass in a parameter from the command line by piping in a JSON object
echo '{"name": "John"}' | fn -v invoke fn-demo-app fn-demo-helloYou may want to run your program locally through URL access. We can also test by starting up a REST test client such as Postman and calling the invocation URL that we get by inspecting the function. To find the invocation URL we can run the following command, or a variation of.
fn inspect function fn-demo-app fn-demo-hello | jq -r '."annotations"."fnproject.io/fn/invokeEndpoint"'
We can then take that URL to build up an endpoint in Postman:
Deploy to Oracle Cloud
Now that we have a serverless function, we can look to deploy this to our cloud environment.
Configure your tenancy
You will need to set up some policies to enable serverless functions to work within your cloud environment. These are all in the functions documenttion but at the most basic level you need to give the Functions service access to both the network as well as the ability to read the container registry - where the docker images end up living. Depending on your current permission levels you may need some additional policies - refer back to the aforementioned documentation for full details.
Allow service FaaS to use virtual-network-family in compartment fn-demo
Allow service FaaS to read repos in tenancy
We will also need to make sure to set up a Docker container registry. This is so Fn has somewhere to push your Docker images to. In the console, go to Developer Services -> Container Registry. Then Create a Repository - for this post, I created one called fn-demo-repo.
You also need to have an API token to log into this registry - done through the user details page within the OCI Console. The login URL becomes one of the URLs specified here. You username would become the object storage namespace + your regular login e-mail address: abcdefabcdef/user@email.com. And finally the password would be your generated API token.
So at the command prompt, enter: docker login mel.ocir.io (adjusting the URL depending on your location) and follow the prompts.
Configure Fn to talk to Oracle Cloud
Fn works with contexts. So far we have been using the default context - which is typically our local environment. In order to use our Function against Oracle Cloud we need to create a new context, and set some configuration. Information will will need for this:
- The OCID of the compartment where your function will live
- The API URL - this is dependent on the region of your function
- The registry URL <region key>.ocir.io/<object storage namespace>/repo-name
- The profile name used to connect to OCI (from your $HOME/.oci/config file)
Once you have that information, you will set it up your context similar to:
fn create context oci-demo-context --provider oracle
fn use context oci-demo-context
fn update context oracle.compartment-id TODO_COMPARTMENT_ID
fn update context oracle.profile DEMO
fn update context api-url https://functions.ap-melbourne-1.oci.oraclecloud.com
fn update context registry mel.ocir.io/<namespace>/fn-demo-repo
At this point you will want to verify the configuration is working by trying to list your apps. You should see an empty list.
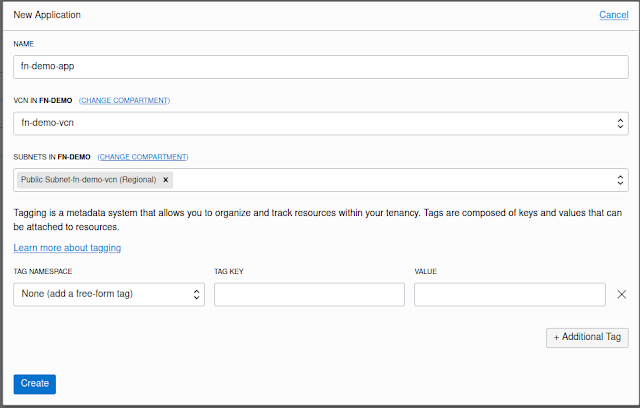
In the Console, go to Developer Services -> Functions and create a new application. I called mine fn-demo-app
Now we can go ahead and deploy our function
fn deploy --app fn-demo-app
Now that our function is deployed, we can test in a number of ways:
- Using fn invoke much like we did when we set up our function to run locally
- Using the OCI CLI client with the command oci fn function invoke --function-id TODO --body TODO
- Using the OCI CLI client with the raw-request sub-command - using the URL you get by inspecting the function using fn inspect
- Using the oci-curl custom bash script you can build, that handles all the signings, using the URL you get by inspecting the function using the fn tool
- Set up an API Gateway Service - be sure that your VCN has the relevant security group rules in place to accept HTTPS requests
Quick Links
https://docs.cloud.oracle.com/en-us/iaas/Content/Functions/Concepts/functionsprerequisites.htm
https://docs.cloud.oracle.com/en-us/iaas/Content/Functions/Tasks/functionsinvokingfunctions.htm
https://github.com/fnproject/fdk-go/blob/225736950b1c233d370a4c97cd4633f2198deec9/fdk_example_test.go


